
Disclaimer: PDF documents are not recommended for any creator wishing to maintain the accessibility of the content within a document; they are meant primarily for printing. The acronym “PDF” stands for “Portable Document Format,” which conveys the fact that the file is designed to preserve the file’s formatting regardless of the device used to access it. However, if you do wish to use PDFs, this page serves as a reference for making them accessible.
When to Use PDFs
The first rule for using PDFs is as follows: please don’t! Whenever possible, choose an HTML webpage or a more accessible file format instead. PDFs should be avoided because they are among the least accessible types of digital documents, and making them accessible often requires significant time and effort. In contrast, HTML webpages and Microsoft Office documents are much easier to make accessible. Generally speaking, PDFs should only be used when a fixed layout is essential—such as for documents intended for printing.
Adobe Acrobat Pro
Adobe Acrobat Pro is required to tag a PDF document. The software is available for broad use in campus computer labs, and for download by faculty and staff to a managed machine. For support with installation, faculty and staff should contact their IT support.
The names and locations of certain tools within Adobe Acrobat Pro may differ depending on your device’s operating system and version of Adobe Acrobat Pro. This guide assumes a Windows 11 64-bit operating system, Version 2025.001.20435.
Getting Set Up
From the “All Tools” menu in Acrobat Pro, make sure the Prepare for Accessibility tool, the Scan & OCR tool, and the Action Wizard appear in your tool sidebar (on some versions of Acrobat Pro, these may need to be manually added from the “Tools” menu). Make sure that the file you are remediating has been made as accessible as possible using its source application. For example, if a PDF was originally created in Microsoft Word, ensure that as many accessibility features have been added to it as possible before attempting to remediate the converted PDF of it using Acrobat Pro. If you have converted the document to a PDF using the “Save As” function and not the “Print to PDF” function, the accessibility features that you added to the original Word document should transfer over to the converted PDF. This same principle applies to all other source file types as well.
Ensure the PDF Has an OCR Layer
Optical Character Recognition (OCR) allows screen reader and text-to-speech programs to read aloud text in a PDF to their users. Therefore, PDFs with text must possess an OCR layer. To check if a PDF has an OCR layer, try highlighting the text in the PDF document. If you can highlight individual words and letters, this means it has an OCR layer already. If you cannot highlight individual words and letters, then it does not. To add an OCR layer:
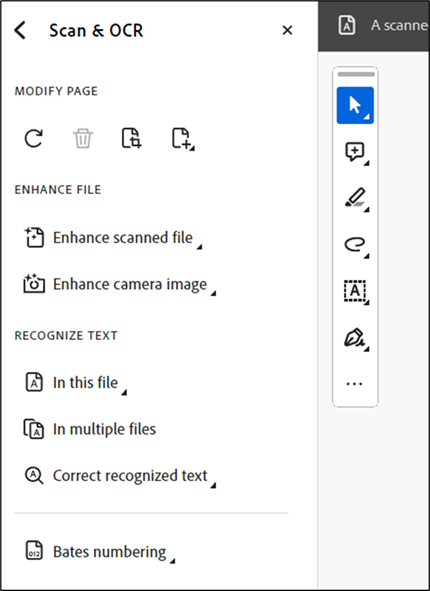
- All Tools > Scan & OCR > Under the “Recognize Text” subsection, select In This File.
- The Recognize Text options are then displayed in the dialogue box. Specify the options as needed.
- Select Recognize Text. Acrobat will then create an OCR layer.
Fixing OCR Errors
To review the OCR layer and make corrections to it as needed:
- All Tools > Scan & OCR > Under the “Recognize Text” subsection, select Correct Recognized Text.
- All suspects on the page will be enclosed in red boxes.
- Go through each potential error and correct them as needed using the Recognized As box in the pop-up dialogue box. Then select Accept. The next suspect will then be highlighted. Continue correcting each mistake as needed.
Tags
PDFs are basically static images. To make a static image accessible to screen reader programs and other technologies, two layers of metadata need to be added. One of these layers is the “tags layer” (the other is the OCR layer). In PDFs, “tags” communicate the various elements are present on any given page of the document to a screen reader program.
Check If a PDF Has Tags
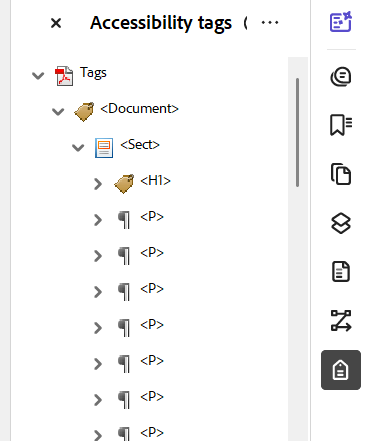
- Menu > View > Show/Hide > Side Panels > Accessibility Tags.
- Select the tag icon in the side panel to open and close the Tag Tree Panel as needed.
Adding Tags
All Tools > Prepare for Accessibility > Automatically Tag PDF.
All content on every page must either be tagged or marked as an artifact.
Tag Types
Some common types of tags include:
- <P>: Paragraph tag
- <H1>, <H2>, <H3>, etc.: Heading tags
- <Figure>: Graphic, picture, or illustration tag
- <Link>: Link tag
- <L>: List tag
- <Span>: Any kind of content that needs to be kept separate, either because of formatting, language, or for alternate text
- <Div>: Grouping element
A detailed overview of the various tag types can be found at Accessible-PDF.info. Note that all completed PDF documents must have a <document> tag as its primary parent tag.
Editing Tags
In the Tag Tree Panel, use the Options menu or right-click (or perform a secondary select on) a tag and choose from the following options:
- New Tag creates a tag in the tag tree below the currently selected item.
- You can cut and paste tags from specific locations in the tag tree, as well as delete tags from the tag tree.
- Paste Child places the tag that is in the clipboard into the location specified, as a “child” or the selected tag.
- You can also change a tag’s type by selecting it in the tags panel and then selecting it again to edit. Deselect it to apply your changes.
The Reading Order Tool
Another way to create and edit tags is by using the Reading Order Tool:
All Tools > Prepare for Accessibility > Fix Reading Order.
With the Reading Order tool open, drag your cursor to select a region of the page that contains one type of content (e.g., a block of text). Then select the appropriate button in the Reading Order dialog box to specify the tag type to apply to it.
Reading Order
The reading order of PDFs follows the order of the tags in the Tag Tree Panel. To change the reading order of the elements on a page, reorder the tags by dragging and dropping the tag into a new position in the tag tree, or by cutting and pasting the tags into the desired order.
Lists
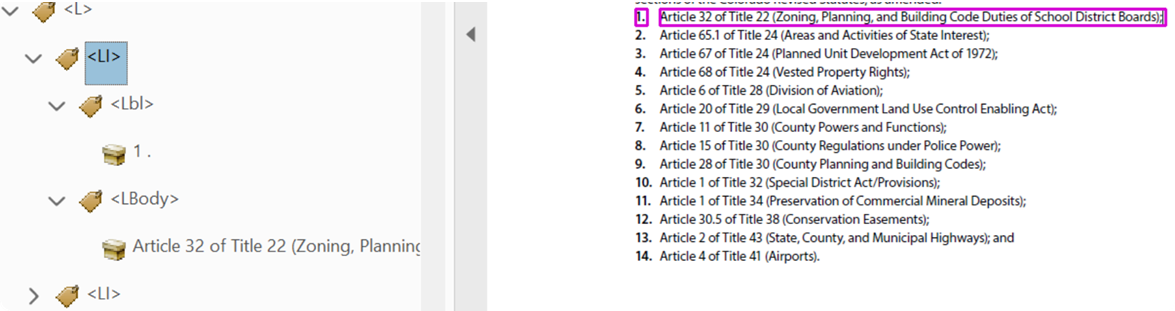
All lists must have the List tag and List Items tags. Each List Item tag may also have Label and List Body tags nested within them as child tags.
- Open the Tag Tree Panel and locate any mistagged list items (they will usually be mis-tagged as <P> tags instead).
- Create an <L> tag for the list if it is missing (right-click on the existing tag and select “New Tag”).
- Change any mis-tagged individual List Items to <LI> tags and make each <LI> tag in the list children of the <L> tag. The <L> tag is the ‘container’ that holds the <LI> tags in it. The <LI> tags, in turn, are the ‘containers’ that hold the <Lbl> and <LBody> tags.
To Create <Lbl> or <LBody> Tags:
- Options > Create New Tag > type “Lbl” or “LBody” > Enter.
- Select the empty or tag in the Tag Tree Panel > On the page itself, highlight the content that you want to put inside the or tag > Options > Create Tag From Selection.
All <Lbl> and <LBody> tags must be children of <LI> tags.
Adding Alt Text to Images
- All Tools > Prepare for Accessibility > Add Alternate Text.
- A dialogue box will appear saying Acrobat Pro will detect all figures in the document and display its associated alt text.
- If a figure does not have alt text, add it to the text box associated with it within the dialogue box and then navigate to the next figure using the on-screen arrow buttons, Repeat as needed.
- To mark a figure as decorative, select the “decorative figure” checkbox in the dialogue box associated with it. This will ensure that screen readers will ignore that figure.
- Select Save & Close when finished.
Adding Table Headers
Tables must be marked with a <Table> tag and contain Table Header <TH> cells and Table Data <TD> cells. To add Table Headers to a table:
- Locate the table in the Tag Tree Panel and expand the view of the tags so that it shows the Table Row <TR> tags .
- Expand the first Table Row <TR> tag. If the children of the first Table Row tag are Table Data <TD> cell tags, change each tag to a Table Header <TH> tag by selecting each <TD> tag and then editing them to <TH> tags. Deselecting each tag will apply changes you make.
For more detailed information about how to tag tables, visit our guide on Accessible Tables.
Using Acrobat Pro’s Accessibility Checker
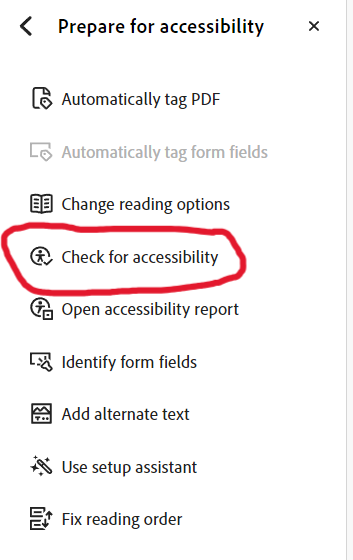
Adobe Acrobat Pro has a built-in accessibility checker, which detects common elements that require further user action in order to be made accessible, such as form fields, unassigned or missing metadata, or encoding errors. To access the built-in accessibility checker:
All Tools > Prepare for Accessibility > Check for Accessibility
You can run an accessibility check on all PDFs except for dynamic forms (XFA documents) and portfolios. The subsequent accessibility report will prompt you to address detected accessibility issues.
For more information, please visit How to Check if Your PDF is Accessible.